An update to Redsn0w 0.9.6 iOS 4.3.1 jailbreak is available now which is said to fix up the issues related to boot animation, while is noteworthy that Sn0wbreeze 2.5.1 for Windows still could be used to boot customized animated logos on iPhone, iPad and iPod Touch.
All you need to do now is to simply download Redsn0w 0.9.6rc 12 for Windows or Mac using the links given below and jailbreak your iPhone 4, 3GS, iPod Touch 4G/3G and iPad, all of them running on iOS 4.3.1 firmware.
If your iPad, phone or iPod has already been jailbroken using Redsn0w 0.9.6rc9, rc10 or rc11, download this Redsn0w 0.9.6rc 12 and rerun over the existing jailbreak. Remember to uncheck the “Install Cydia” option when you rerun.
This is a tutorial on how to use the new version of Redsn0w 0.9.6rc12 to run an untethered jailbreak on all iDevices running 4.3.1 firmware EXCEPT for the iPad2 which will be out shortly. Again we must stress that you should not under any circumstances update to 4.3.1 if you require unlock until Ultrasn0w has been updated. This tutorials is for both Mac and PC.
DOWNLOAD:
Redsn0w 0.9.6rc12 – Windows
Redsn0w 0.9.6rc12 – Mac
4.3.1 firmware for your device or
You can download on Direct Download Links for iOS 4.3.1 (Official from Apple)
Step 1: Restore or update(we recommend clean restore) your firmware to 4.3.1 you can use the firmware file you downloaded by clicking shift+restore instead of downloading it from the Apple server.
Step 2: Start Redsn0w 0.9.6rc12 and point it to the 4.3.1 firmware you downloaded

Step 3: After you’ve selected the firmware and Redsn0w says “firmware verified” click next and you will see a progress bar as Redsn0w prepares the firmware with the jailbreak data. If successful you will be brought to the options screen where you should select “Install Cydia” and “Allow boot animation” if you want to enable custom bootlogos.

Step 4: After you’ve checked the boxes “Install Cydia” and “Allow boot animation” click next which will bring you to a screen that will prepare you to enter DFU mode. Please power off your device and connect it(if not already) at this time.

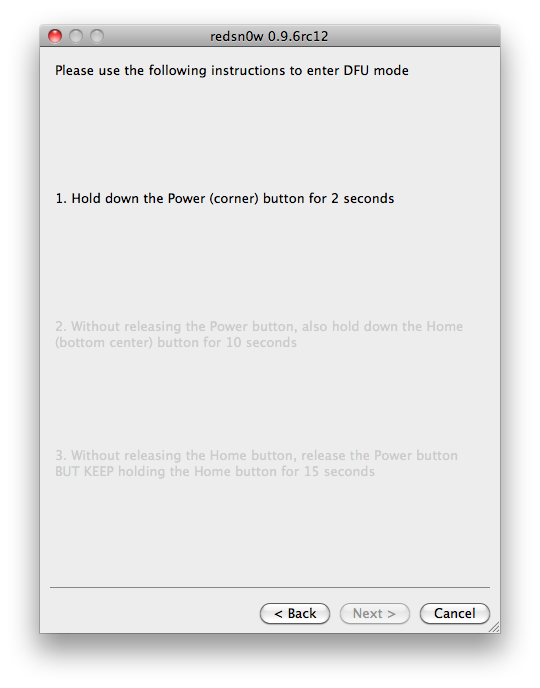
Step 5: At this time, Redsn0w will walk you through the DFU mode process if you don’t know how to do it already. If you are having issues with timing, you might want to check out DFU mode video tutorial which will help you get the timing down.
Step 6: Congratulations you’ve made it to the end! As soon as Redsn0w detects your device in DFU mode you can just sit back and relax while it does it’s thing! As soon as it is complete, you will be jailbroken and untethered on 4.3.1! If you have any feedback or questions please feel free to post below. Thanks!
DFU mode video tutorial
 Some of our users have reported an issue with Redsn0w that it will get stuck during the “uploading ramdisk” portion of the process. The fix for this is very simple. Go to where Redsn0w is stored and right-click it and select “properties” under the compatibility tab change the compatibility mode to “Windows XP Service Pack 2″ and check the box that says “run as administrator.” After you have done those 2 things hit apply and then re-open Redsn0w and try the jailbreak process again. It should go through without a hitch!
An easy solution to fix the issue redsn0w has where it gets stuck on uploading ramdisk.Follow these steps to fix the issue with redsn0w:

- Run redsn0w
- Open task manager
- Find redsn0w.exe, right-click and click on Set Affinity
- Only check CPU 1, then hit OK
- Now redsn0w won’t get stuck on uploading ramdisk when trying to jailbreak your iOS device!
ANOTHER Thing You Can Try Is Holding The HOME Button Throughout The ENTIRE Redsn0w Jailbreak.
PwnageTool 4.3

A very popular tool, which just celebrated its 3rd birthday, is used for jailbreaking devices in a more customizable way. Redsn0w is quick and easy; you simply check off some boxes and you’re jailbroken. However, there’s not much you can do with the jailbreak if you use Redsn0w. That’s where PwnageTool comes in.
PwnageTool creates custom firmware (.IPSW) files, and you can jailbreak your device by restoring to the custom firmware with iTunes. There are two modes for going about this PwnageTool jailbreak – Expert mode and Simple mode. If you are a fan of customization, expert mode is the way to go. If you are new to this and don’t necessarily want customization, I recommend using Redsn0w, (see tutorial above).
1. As seen below, you must first choose what device you would like to create the custom firmware for.

2.1. We are going to be doing this in Expert mode, so click on the “Expert mode” button before selecting the device. Once you have selected your device, you will see a “Browse for IPSW” screen. Simply browse for and select the 4.3.1 IPSW file you want to use. Once you have done that, you will see the following screen.

As far as customization goes, you will not need to worry about the General options. The true customization comes from the Cydia packages screen. Once you click on this, click on the Download packages tab and press the Refresh button.

2.2. This is great because you can select any package you want to be pre-installed on the device, rather than having to go and install the packages from Cydia after you jailbreak it. If you want to download a package, simply double click on it and it will download. To ensure that it is installed, go to the Select packages tab when you are ready to go and check off the ones you want to have installed.
Almost done! Now, go back to the screen seen below and click build. Then, press the blue arrow in the bottom-right hand corner.

3. Click build and you will see this window:

Save the file as whatever name you’d like, or keep it how it is. Press save, and your custom firmware creation will begin.

Notice: this will take awhile to build. iPhone firmware files nowadays are huge (~600 MB) so please be patient! If you are curious as to what PwnageTool is actually doing to make the new firmware, click the “Log” tab at the top and you can see exactly what is going on!
Once the firmware creation is done, follow the onscreen instructions to put your device into DFU mode. Then, simply restore your device in iTunes with the custom firmware by pressing the “option” or “alt” key on your keyboard and clicking on “Restore.”
Download PwnageTool 4.3.3
PwnageTool is for Mac only. Windows users will need to use sn0wbreeze or redsn0w.
- Download Now (Mirror 2) (Mirror 3) (Mirror 4)


0 comments:
Post a Comment